
| 일 | 월 | 화 | 수 | 목 | 금 | 토 |
|---|---|---|---|---|---|---|
| 1 | 2 | 3 | ||||
| 4 | 5 | 6 | 7 | 8 | 9 | 10 |
| 11 | 12 | 13 | 14 | 15 | 16 | 17 |
| 18 | 19 | 20 | 21 | 22 | 23 | 24 |
| 25 | 26 | 27 | 28 | 29 | 30 | 31 |
Tags
- github
- 스파르타코딩클럽
- 오창식당
- pycharm
- 이클립스 글씨체
- 이클립스 테마
- openapi
- 아이폰
- 이클립스
- git hub
- 개발자옵션
- mongodb
- 개발
- API
- 오창
- 오창 돈까스
- eclipse
- 파이참
- 내돈내산
- 안드로이드개발자모드
- 코딩
- 맥북
- 이클립스 폰트
- 중국노래
- db데이터찾기
- 오창 식당
- 오창맛집
- ajax
- json
- 맥북단축키
Archives
- Today
- Total
나의 기록_나의 다이어리
[스파르타코딩클럽: 웹개발종합반] 2주차 정리 (Ajax 설명) 본문
반응형
SMALL
반응형
SMALL
1. Ajax 란? (Asynchronous JavaScript and XML의 약자)
- Ajax는 빠르게 동작하는 동적인 웹 페이지를 만들기 위한 개발 기법의 하나.
- Ajax는 웹 페이지 전체를 다시 로딩하지 않고도, 웹 페이지의 일부분만을 갱신할 수 있다. 즉 Ajax를 이용하면 백그라운드 영역에서 서버와 통신하여, 그 결과를 웹 페이지의 일부분에만 표시할 수 있다.
- 이때 서버와는 다음과 같은 다양한 형태의 데이터를 주고받을 수 있습니다.
- JSON
- XML
- HTML
- 텍스트 파일 등
❗️참고❗️
Ajax는 jQuery를 임포트한 페이지에서만 동작 가능합니다.
즉, http://google.com/ 과 같은 화면에서 개발자도구를 열면, jQuery가 임포트 되어있지 않기 때문에 아래와 같은 에러가 뜹니다. Uncaught TypeError: $.ajax is not a function → ajax라는 게 없다는 뜻
2. Ajax 기본 골격
$.ajax({
  type: "GET",
  url: "여기에URL을입력",
  data: {},
  success: function(response){
    console.log(response)
  }
})- Ajax 코드 해설
$.ajax({
  type: "GET", // GET 방식으로 요청한다.
  url: "http://spartacodingclub.shop/sparta_api/seoulair", // OpenAPI 주소
  data: {}, // 요청하면서 함께 줄 데이터 (GET 요청시엔 비워두세요)
  success: function(response){ // 서버에서 준 결과를 response라는 변수에 담음
    console.log(response) // 서버에서 준 결과를 이용해서 나머지 코드를 작성
  }
})- $ajax 코드 설명
- type: "GET" → GET 방식으로 요청한다.
- url: 요청할 url
- data: 요청하면서 함께 줄 데이터 (GET 요청시엔 비워두세요)
- GET 요청은, url뒤에 아래와 같이 붙여서 데이터를 가져갑니다.
- POST 요청은, data : {} 에 넣어서 데이터를 가져갑니다.
- data: { param: 'value', param2: 'value2' },
- success: 성공하면, response 값에 서버의 결과 값을 담아서 함수를 실행한다.
- 결과가 어떻게 response에 들어가나요? → 받아 들이셔야 합니다..! (대부분의 개발자들도 내부 원리는 코드를 안 뜯어봐서 몰라요.^^;;)
success: function(response){ // 서버에서 준 결과를 response라는 변수에 담음
  console.log(response)
}
3. Ajax 통신의 결과값을 개발자도구 콘솔에 찍어보기
$.ajax({
  type: "GET",
  url: "http://spartacodingclub.shop/sparta_api/seoulair",
  data: {},
  success: function(response){
		// 값 중 도봉구의 미세먼지 값만 가져와보기
		let dobong = response["RealtimeCityAir"]["row"][11];
		let gu_name = dobong['MSRSTE_NM'];
		let gu_mise = dobong['IDEX_MVL'];
		console.log(gu_name, gu_mise);
  }
})- 모든 구의 미세먼지 값을 찍어보기
$.ajax({
type: "GET",
url: "http://spartacodingclub.shop/sparta_api/seoulair",
data: {},
success: function (response) {
let mise_list = response["RealtimeCityAir"]["row"];
for (let i = 0; i < mise_list.length; i++) {
let mise = mise_list[i];
let gu_name = mise["MSRSTE_NM"];
let gu_mise = mise["IDEX_MVL"];
console.log(gu_name, gu_mise);
}
}
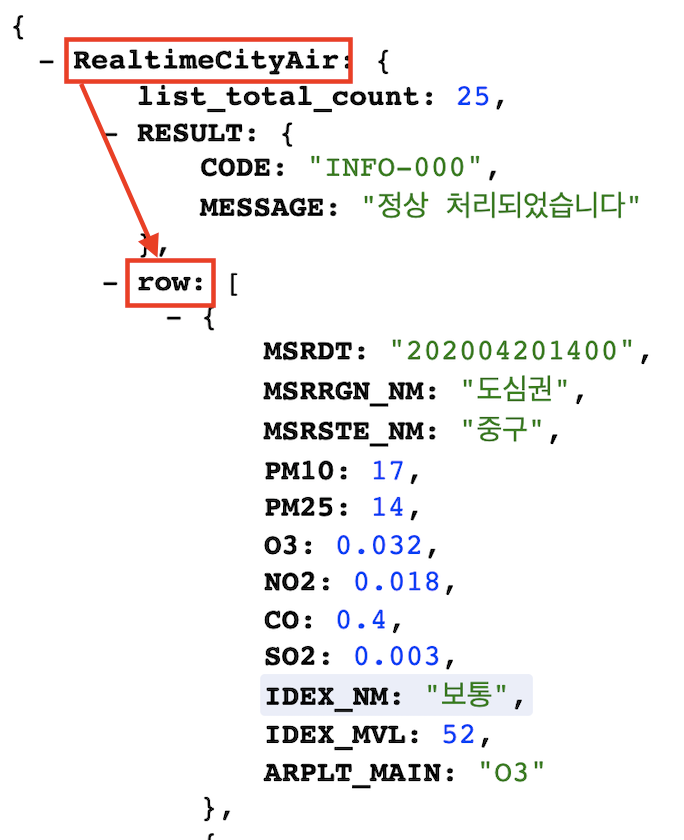
});1) 미세먼지 데이터가 어디에 있는지 찾기
: RealtimeCityAir > row 에 미세먼지 데이터를 꺼내기
$.ajax({
  type: "GET",
  url: "http://spartacodingclub.shop/sparta_api/seoulair",
  data: {},
  success: function(response){
		let mise_list = response["RealtimeCityAir"]["row"]; // 꺼내는 부분!
		console.log(mise_list);
  }
})
2) 반복문으로 구 데이터를 출력해보기
: row의 값을 mise_list에 담았으니, 반복문을 이용해보겠습니다!

$.ajax({
  type: "GET",
  url: "http://spartacodingclub.shop/sparta_api/seoulair",
  data: {},
  success: function (response) {
    let mise_list = response["RealtimeCityAir"]["row"];
    for (let i = 0; i < mise_list.length; i++) {
      let mise = mise_list[i];
      console.log(mise);
    }
  },
});
3) 구 데이터에서 구 이름, 미세먼지 수치를 골라내어 출력하기
: 구 이름 키 값인 "MSRSTE_NM", 미세먼지 수치 키값인 "IDEX_MVL"의 밸류를 출력

$.ajax({
  type: "GET",
  url: "http://spartacodingclub.shop/sparta_api/seoulair",
  data: {},
  success: function (response) {
    let mise_list = response["RealtimeCityAir"]["row"];
    for (let i = 0; i < mise_list.length; i++) {
      let mise = mise_list[i];
      let gu_name = mise["MSRSTE_NM"];
      let gu_mise = mise["IDEX_MVL"];
      console.log(gu_name, gu_mise);
    }
  }
});
반응형
LIST
'코딩 > 국비지원 개발인강 (스파르타코딩클럽)' 카테고리의 다른 글
'코딩/국비지원 개발인강 (스파르타코딩클럽)' Related Articles
more


Comments